Building Reliable AI Agentic Workflows with Node.js
How to Build Profitable AI Automation Services Using Node.js and Agentic Workflows
The current gold rush in the digital economy is not about building the next massive Large Language Model (LLM); it is about building the infrastructure that makes LLMs useful for businesses. Companies are desperate to move past simple chatbots and toward Agentic Workflow systems—autonomous loops where AI can perform tasks, make decisions, and interact with databases without constant human supervision.
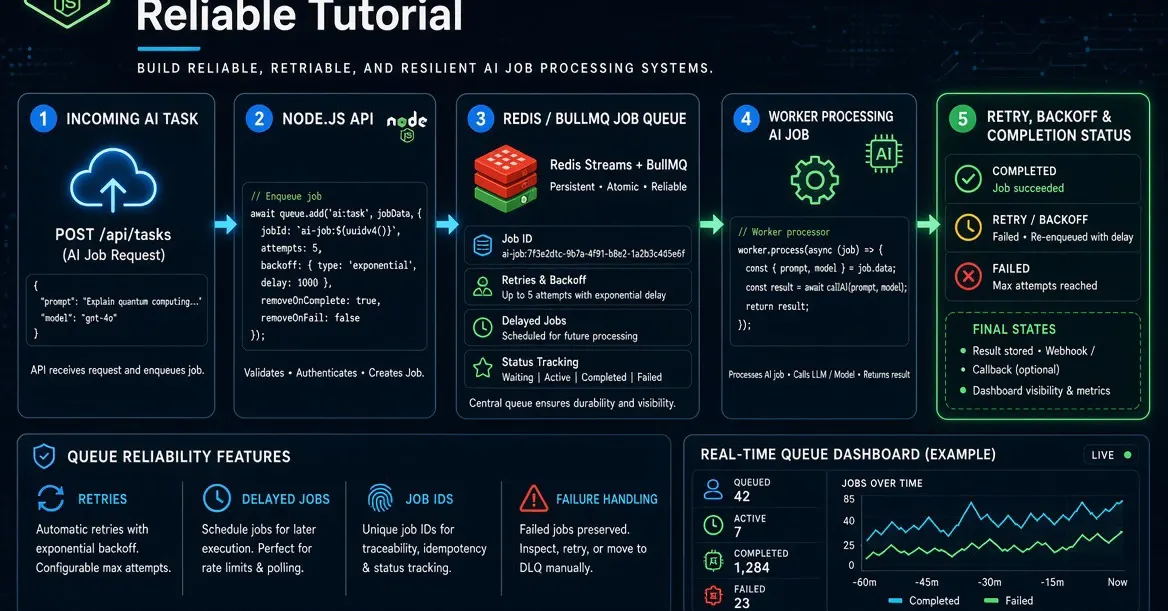
If you are a developer or a technical entrepreneur, there is a massive opportunity to sell high-ticket automation services on platforms like Upwork and Fiverr. Instead of offering "AI writing," you can offer "Automated Enterprise Data Classification" or "Autonomous Customer Support Triaging." To do this, you need more than just an API key; you need a robust Backend Engineering foundation.
The Architecture of a Reliable AI Agent
Most beginners fail at AI automation because they try to run everything in a single, long-running HTTP request. If the OpenAI API hangs or the network flickers, the entire process crashes, and the data is lost. To build a professional-grade AI Workflow, you must decouple the "request" from the "execution."
A production-ready system requires four distinct layers:
- The API Layer: An Express.js server that receives webhooks and validates incoming data.
- The Persistence Layer: A PostgreSQL database that acts as the "
- The Message Broker: Redis and BullMQ to manage a queue of background tasks.
- The Worker Layer: A dedicated process that handles the heavy lifting, communicates with the LLM, and updates the database.
By separating these concerns, you ensure that even if the AI takes 30 seconds to respond, your API remains lightning-fast and responsive to the client.
Step 1: Setting Up the Technical Stack
To build this, we will use Node.js due to its non-blocking I/O capabilities, which are perfect for handling multiple asynchronous AI calls. We will also use TypeScript to ensure our data structures remain predictable—a necessity when dealing with the unpredictable nature of LLM outputs.
First, initialize your project and install the essential dependencies:
mkdir node-ai-workflow
cd node-ai-workflow
npm init -y
npm install bullmq dotenv express ioredis openai pg pino pino-http zod
npm install -D @types/express @types/node @types/pg tsx typescript
In this stack, BullMQ is our engine for Automation. It allows us to schedule jobs, retry failed AI calls, and manage concurrency so we don't hit OpenAI rate limits too quickly.
Step 2: Designing the Intake API
The first goal is to create a "Work-Intake" service. When a client sends data (like a customer email or a support ticket), we don't want to make them wait for the AI to think. We want to accept the data, save it, and tell them, "We've got it."
Using Express.js, we create a POST endpoint. The workflow is as follows:
- Receive the payload
- Validate the payload using Zod to ensure the data is clean.
- Store the raw data in PostgreSQL.
- Add a job to the BullMQ queue.
- Return a
202 Acceptedstatus code.
This pattern is highly scalable. You could be processing ten requests or ten thousand; the API will never feel slow because the actual "intelligence" is happening in the background.
Step 3: Implementing the Agentic Worker
This is where the magic happens. The worker is a separate process that constantly listens to the Redis queue. When a new job appears, the worker performs the following Agentic Workflow:
1. Data Retrieval: The worker pulls the job ID from the queue and fetches the full record from PostgreSQL. This ensures the worker is always working with the most recent, canonical data.
3. Deterministic Validation: This is the most critical step. LLMs are probabilistic, meaning they can sometimes return "hallucinated" or poorly formatted text. We use Zod to enforce a strict schema on the AI's response. If the AI returns invalid JSON, the worker can catch the error and retry the job.
4. State Update: Once the AI's output is validated, the worker saves the result back to PostgreSQL, marking the job as "completed."
Monetizing Your Expertise: From Code to Cash
Once you master this architecture, you are no longer just a "coder"—you are an Automation Architect. Here is how you can turn these skills into a recurring revenue stream:
1. High-Ticket B2B Consulting
Target medium-sized enterprises that are struggling with manual data entry or support triage. Instead of selling them a subscription to a generic tool, sell them a custom-built, self-hosted Node.js solution that integrates directly with their existing databases. These contracts can range from $5,000 to $50,000 depending on complexity.
2. Micro-SaaS Products
Use this architecture to build a niche SaaS. For example, a tool specifically for law firms to automatically summarize incoming discovery documents, or a tool for e-commerce brands to categorize thousands of customer reviews. By using BullMQ and Redis, your SaaS will be robust enough to handle growth without constant manual intervention.
3. Content and Education
Platforms like Gumroad or YouTube are excellent for selling deep-dive technical courses. Developers are willing to pay a premium to learn how to move beyond "Hello World" AI scripts and into professional Backend Engineering for AI agents.
Summary of the Professional Stack
To succeed in the AI economy, your technical decisions must prioritize reliability over novelty. Always remember these core principles:
- Never use an LLM as your primary database. Use PostgreSQL for state and the LLM for interpretation.
- Always use a queue. Use Redis and BullMQ to handle the inherent latency and instability of AI APIs.
- Validate everything. Use Zod to bridge the gap between the probabilistic world of AI and the deterministic world of software engineering.
By mastering this Agentic Workflow, you position yourself at the intersection of two of the most profitable trends in technology: high-level Automation and advanced Backend Engineering.